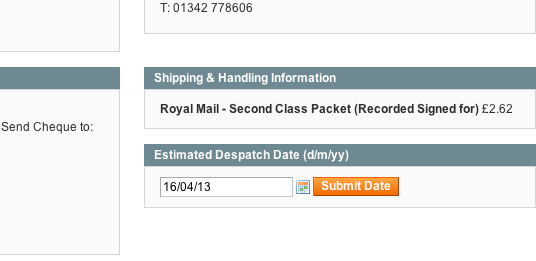
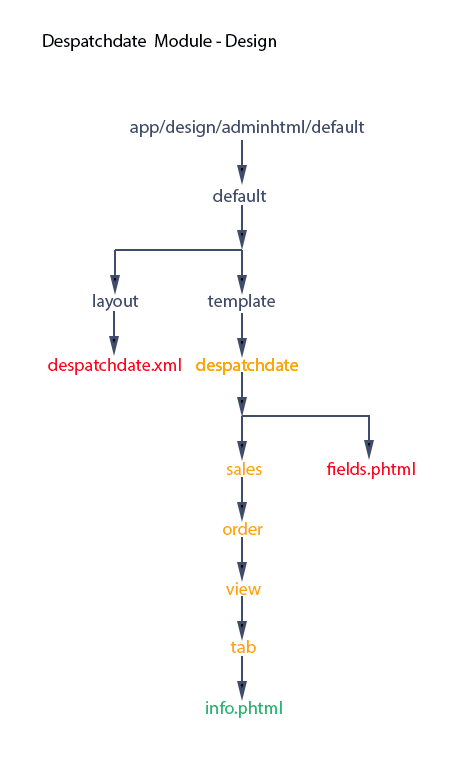
In this the third post of the series to add a Despatch Date field in Magento Admin, we’re going to use jQuery and prototype to enhance our form. jQuery to add some validation and prototype to add a datepicker. Before we get that far, let’s enhance the appearance of our form and make it consistent with other elements on the page.
This is where we are headed:
Here’s fields.phtml again with the lines shown in red that we want to change.
1<div>
2<div class=”entry-edit-head”>
3<h4><?php echo $this->__(‘Estimated Dispatch Date (d/m/yy)’) ?></h4>
4</div>
5<div class=”fieldset”>
6<form id=”dateform” action=”<?php echo $this->getUrl(‘despatchdate/form/post’)?>” method=”POST”>
7<input type=”hidden” name=”form_key” value=”<?php echo $this->getFormKey(); ?>” />
8<input type=”text” class=”input-text” id=”estDestDate” name=”estDate” />
9<input type=”submit” class=”form-button” id=”submit” name=”submit” value=”Submit Date”/>
10</form>
11</div>
12</div>
By inspecting the page in your browser, you’ll see the css classes that have been applied to similar elements. We can see that by adding the classes “entry-edit-head”, “input-text” and “form-button” to lines 2, 8, and 9 respectively, we’ll format heading, input box and submit button in the same way as other elements on the page. Phew all done without going near our style sheet!
Adding the datepicker with prototype
OK, now we’ll add the datepicker. You can see the icon for it in our target screen pic shown above. Prototype is the native javascript library within Magento, so although we might have some other favourite library like jQuery for example, we’d be remiss not to take advantage of Magento’s already available prototype features. Let’s access prototype’s datepicker.
If we take a look in app/design/adminhtml/default/default/layout/main.xml, we can see the prototype and css files needed for datepicker (in red) which are added to the head of most Admin pages within the <default></default> tags using <action method=””> </action>.
54<default>
55<block type=”adminhtml/page” name=”root” output=”toHtml” template=”page.phtml”>
56<block type=”adminhtml/page_head” name=”head” as=”head” template=”page/head.phtml”>
57<action method=”setTitle” translate=”title”><title>Magento Admin</title></action>
58<action method=”addJs”><script>prototype/prototype.js</script></action>
:
97<action method=”addItem”><type>js_css</type><name>calendar/calendar-win2k-1.css</name><params/></action>
98<action method=”addItem”><type>js</type><name>calendar/calendar.js</name></action>
99<action method=”addItem”><type>js</type><name>calendar/calendar-setup.js</name></action>
100
101<action method=”addItem”><type>js</type><name>extjs/ext-tree.js</name><params/><if/><condition>can_load_ext_js</condition></action>
As we can see the prototype files we need are located in js/calendar/. Its handy that we already have these files loaded for our Admin pages. In frontend, app/design/frontend/default/ourtheme/layout/page.xml does not add these prototype files by default. (The frontend file page.xml performs a similar function for frontend as main.xml does for Admin.) So if wanted to add a datapicker within frontend, we’d have to amend app/design/frontend/default/ourtheme/layout/local.xml. We’d use something like this:
1<layout>
2<default>
3<reference name=”head”>
4<action method=”addItem”><type>js_css</type><name>calendar/calendar-win2k-1.css</name></action>
5<action method=”addItem”><type>js</type><name>calendar/calendar.js</name></action>
6<action method=”addItem”><type>js</type><name>calendar/calendar-setup.js</name></action>
7</reference>
8</default>
9</layout>
Note that in our example here we use ‘addItem’. Later we’ll show a slightly different approach using ‘addJS’ to add Javascript files.
Here’s fields.phtml again with the lines shown in red that we want to add.
1 <div>
2 <div class=”entry-edit-head”>
3 <h4><?php echo $this->__(‘Estimated Dispatch Date (d/m/yy)’) ?></h4>
4 </div>
5 <div class=”fieldset”>
6 <form id=”dateform” action=”<?php echo $this->getUrl(‘despatchdate/form/post’)?>” method=”POST”>
7 <input type=”hidden” name=”form_key” value=”<?php echo $this->getFormKey(); ?>” />
8 <input type=”text” class=”input-text” id=”estDestDate” name=”estDate” />
9 <img title=”Select date” id=”estDestDate_trig” src=”<?php echo Mage::getBaseUrl(Mage_Core_Model_Store::URL_TYPE_SKIN) . ‘adminhtml/default/default/images/grid-cal.gif’;?>” class=”v-middle”>
10 <input type=”submit” class=”form-button” id=”submit” name=”submit” value=”Submit Date”/>
11 </form>
12 </div>
13 </div>
14
15 <script type=”text/javascript”>
16 Calendar.setup({
17 inputField : ‘estDestDate’,
18 ifFormat : ‘%e/%m/%y’,
19 button : ‘estDestDate_trig’,
20 align : ‘Bl’,
21 singleClick : true
22 });
23 </script>
We add the image icon in line 9. Using the parameter Mage_Core_Model_Store::URL_TYPE_SKIN, the getBaseUrl function returns the skin directory, the start of the path where the image is stored, e.g. www.mysite.com/skin/.
We’ve added our javascript in lines 15 through 25, and we call the prototype function in line 17 with the parameters we want. The ‘inputField’ parameter refers to the id of the input field. The ‘button’ parameter refers to the id of the calendar icon image.
With our calendar icon now waiting to be clicked, we can test that our datepicker is working.
Using jQuery with Magento
We’re going to show how we can use jQuery with our site. The task as we’ll see in a moment is to validate form entry. We’re going to be making changes to the files shown in red in our by now familiar design directory path.
We are going to see how we add jQuery files both in Admin and Frontend for the purpose of comparison. We’ve two files: a downloaded jQuery library file and the file we’ve coded to validate our form.
In Admin we’ll make the following additions in red to despatchdate.xml.
1 <?xml version=”1.0″?>
2 <layout>
3 <adminhtml_sales_order_view>
4 <reference name=”order_tab_info”>
5 <action method=”setTemplate”>
6 <template>despatchdate/sales/order/view/tab/info.phtml</template>
7 </action>
8 <block type=”despatchdate/fields” name=”despatchdate” template=”despatchdate/fields.phtml” />
9 </reference>
10 <reference name=”head”>
11 <action method=”addJs”><script>jquery/jquery.js</script></action>
12 <action method=”addJs”><script>jquery/date_validation.js</script></action>
13 </reference>
14 </adminhtml_sales_order_view>
15 </layout>
This adds both jQuery files to the head of our Order View page and of course we want the library loading first. This is the approach we’ve taken in this exercise. Its clean and avoids tampering with core layout files.
Adding jQuery to frontend would be similar. We’d add to our theme local.xml file selecting an appropriate handle (e.g. a specific page or ‘default’ for frontend-wide) and use the same lines of xml, 10 through 13, in app/design/frontend/default/ourtheme/layout/local.xml.
Sometimes the order in which the jQuery and prototype libraries are loaded is important (not in this exercise). Adding jQuery in despatchdate.xml means that it is loaded after prototype. If you want to confirm this, you could use a Layoutviewer which shows all the layout xml for a particular page request. See Magento for Developers: Part 4 – Magento Layouts Blocks and templates by Alan Storm for more details on using his handy layout viewer.
To load jQuery before prototype we could add this line in app/design/adminhtml/default/default/layout/main.xml immediately before prototype is loaded.
54 <default>
55 <block type=”adminhtml/page” name=”root” output=”toHtml” template=”page.phtml”>
56 <block type=”adminhtml/page_head” name=”head” as=”head” template=”page/head.phtml”>
57 <action method=”setTitle” translate=”title”><title>Magento Admin</title></action>
58 <action method=”addJs”><script>jquery/jquery.js</script></action>
59 <action method=”addJs”><script>prototype/prototype.js</script></action>
The problem here of course is that jQuery loads on all pages (<default>) which may not be what we want. Also main.xml is core code, and we risk losing our changes when we upgrade. If we wanted to have jQuery available before prototype in frontend we’d at least have the luxury of copying app/design/frontend/base/default/layout/page.xml to app/design/frontend/default/ourtheme/layout/page.xml and adding the change there shown in red without changing a core file.
33 <default translate=”label” module=”page”>
34 <label>All Pages</label>
35 <block type=”page/html” name=”root” output=”toHtml” template=”page/3columns.phtml”>
36
37 <block type=”page/html_head” name=”head” as=”head”>
38 <action method=”addJs”><script>jquery/jquery.js</script></action>
39 <action method=”addJs”><script>prototype/prototype.js</script></action>
What if we want to realise the benefits of using Google’s CDN (content distribution network) rather than downloading the jQuery library. As external urls can’t be placed in Magento’s layout files, we’d resort to embedding our code in phtml.
In Admin we could add the following in red in app/design/adminhtml/default/default/template/page/head.phtml.
1 <meta http-equiv=”Content-Type” content=”<?php echo $this->getContentType() ?>”/>
2 <title><?php echo htmlspecialchars(html_entity_decode($this->getTitle())) ?></title>
3 <link rel=”icon” href=”<?php echo $this->getSkinUrl(‘favicon.ico’) ?>” type=”image/x-icon”/>
4 <link rel=”shortcut icon” href=”<?php echo $this->getSkinUrl(‘favicon.ico’) ?>” type=”image/x-icon”/>
5
6 <script type=”text/javascript” src=”http://ajax.googleapis.com/ajax/libs/jquery/1.7.1/jquery.min.js”></script>
7 <script type=”text/javascript”>
8 var $j = jQuery.noConflict();
9 </script>
10
11 <script type=”text/javascript”>
12 var BLANK_URL = ‘<?php echo $this->getJsUrl() ?>blank.html’;
13 var BLANK_IMG = ‘<?php echo $this->getJsUrl() ?>spacer.gif’;
14 var BASE_URL = ‘<?php echo $this->getUrl(‘*’) ?>’;
15 var SKIN_URL = ‘<?php echo $this->getSkinUrl() ?>’;
16 var FORM_KEY = ‘<?php echo $this->getFormKey() ?>’;
17 </script>
Again, though this is not without drawbacks as the file is core and jQuery will be loaded Admin wide. Note the use of var $j = jQuery.noConflict();. Its vital that we use this code before using jQuery on any part of our site. If not here, then at the beginning of any jQuery code file, as we’ll see in a moment (as using head.phtml is not the approach we have taken in this exercise). As both prototype and jQuery use ‘$’ as shorthand to access their respective libraries, conflict would be inevitable unless we use noConflict(). Then in our jQuery code, we use ‘$j’ where we would normally use ‘$’.
Similarly’ if we wanted access to Google’s CDN in frontend, we’d copy app/design/frontent/base/default/template/page/html/head.phtml to our theme directory and make the change in red immediately before other javascript is loaded with <?php echo $this->getCssJsHtml() ?>.
43<script type=”text/javascript” src=”http://ajax.googleapis.com/ajax/libs/jquery/1.7.1/jquery.min.js”></script>
44<script type=”text/javascript”>
45var $j = jQuery.noConflict();
46</script>
47<?php echo $this->getCssJsHtml() ?>
48<?php echo $this->getChildHtml() ?>
49<?php echo $this->helper(‘core/js’)->getTranslatorScript() ?>
50<?php echo $this->getIncludes() ?>
OK enough by way of comparisons and caveats, let’s move on with this post. Here’s our jQuery code for date_validation.js. This should be stored in js/jquery/.
1var $j=jQuery.noConflict();
2$j(“document”).ready (function(){
3$j(‘#dateform’).bind(‘submit’,function(){
4var dateentered = $j(‘#estDestDate’).val();
5var components = dateentered.split(“/”);
6if(components.length !== 3){
7$j(‘#errorwarning’).html(‘<p>Please enter a valid date as d/m/yy</p>’);
8return false;
9}
10if(components[2].length > 4 || components[2].length < 2 || components[2].length == 3){
11$j(‘#errorwarning’).html(‘<p>Please enter a valid date as d/m/yy</p>’);
12return false;
13}
14if(components[2].length == 4){
15if(parseInt(components[2]) > 2030 || parseInt(components[2]) < 2012){
16$j(‘#errorwarning’).html(‘<p>Please enter a valid date as d/m/yy</p>’);
17return false;
18}
19}
20if(components[2].length == 2){
21if(parseInt(components[2]) > 30 || parseInt(components[2]) < 12){
22$j(‘#errorwarning’).html(‘<p>Please enter a valid date as d/m/yy</p>’);
23return false;
24}
25}
26if (! /^[0-9]+$/.test(components[1])) {
27$j(‘#errorwarning’).html(‘<p>Please enter a valid date as d/m/yy</p>’);
28return false;
29}
30if((parseInt(components[1]) > 12 || parseInt(components[1]) < 1)){
31$j(‘#errorwarning’).html(‘<p>Please enter a valid date as d/m/yy</p>’);
32return false;
33}
34if (! /^[0-9]+$/.test(components[0])) {
35$j(‘#errorwarning’).html(‘<p>Please enter a valid date as d/m/yy</p>’);
36return false;
37}
38var Months = [0,31,29,31,30,31,30,31,31,30,31,30,31];
39if (parseInt(components[0]) < 1 || parseInt(components[0]) > Months[parseInt(components[1])]) {
40$j(‘#errorwarning’).html(‘<p>Please enter a valid date as d/m/yy</p>’);
41return false;
42}
43if (parseInt(components[2]) % 4 !== 0 && parseInt(components[0]) == 29) {
44$j(‘#errorwarning’).html(‘<p>Please enter a valid date as d/m/yy</p>’);
45return false;
46}
47}); // end of submit
48}); /*——————— end of doc ready function ——– —————*/
Note again the use of noConflict() in red. As we’ve taken the approach of adding our jQuery library in despatchdate.xml, we’ll need to use noConflict() before we use any jQuery. Note also the use of ‘$j’ where we’d normally be using ‘$’. Also worth a mention is the ever-so-handy ‘return false;’ preventing submit from submitting as it normally would. In a later post, we’ll add to this file to submit our data using AJAX, and then ‘return false;’ will be even more vital.
Our approach is to permit the entry of despatch date as either ‘dd/mm/yy’ or ‘yyyy’. A little toleration goes a long way. We’ve validated each error separately so we could potentially provide a separate error message for each error if we choose to. As this code requires an #errorwarning div, we’ll need to add this to our form in app/design/adminhtml/default/default/template/despatchdate/fields.phtml. As visible in red, we’ve also added some formatting – nice orange to match the rest of the page.
1<div>
2<div class=”entry-edit-head”>
3<h4><?php echo $this->__(‘Estimated Dispatch Date (d/m/yy)’) ?></h4>
4</div>
5<div class=”fieldset”>
6<form id=”dateform” action=”<?php echo $this->getUrl(‘despatchdate/form/post’)?>” method=”POST”>
7<input type=”hidden” name=”form_key” value=”<?php echo $this->getFormKey(); ?>” />
8<input type=”text” class=”input-text” id=”estDestDate” name=”estDate” />
9<img title=”Select date” id=”estDestDate_trig” src=”<?php echo Mage::getBaseUrl(Mage_Core_Model_Store::URL_TYPE_SKIN) . ‘adminhtml/default/default/images/grid-cal.gif’;?>” class=”v-middle”>
10<input type=”submit” class=”form-button” id=”submit” name=”submit” value=”Submit Date”/>
11</form>
12</div>
13<div id=”errorwarning” style=”color:#eb5e00; font-weight:bold;”></div>
14</div>
15
16<script type=”text/javascript”>
17Calendar.setup({
18inputField : ‘estDestDate’,
19ifFormat : ‘%e/%m/%y’,
20button : ‘estDestDate_trig’,
21align : ‘Bl’,
22singleClick : true
23});
24</script>
That’s it, we can now try out entering Despatch Date to test that jQuery is working and working correctly. Of course, a correct entry still won’t lead to any processing. For that we’ll need our controller. First, though we’ll set up the database so that our controlller can use it. And that’s the subject of the next post.

