This is the first in a series of posts, which develop a module for Magento CE 1.7.0.2 to add a despatch date field in Magento Admin. Our aim is to meet our client’s requirement for a field which receives, stores and displays estimated despatch dates for orders and communicates these to customers. We’ll communicate via an email and in the customer’s ‘My Account’ area. The estimated despatch date will typically be entered some time after the order has been received when order preparation time has been assessed. The client also wants the ability to sort orders by despatch date to make clear which orders should be ready for dispatch and which if any may be overdue.
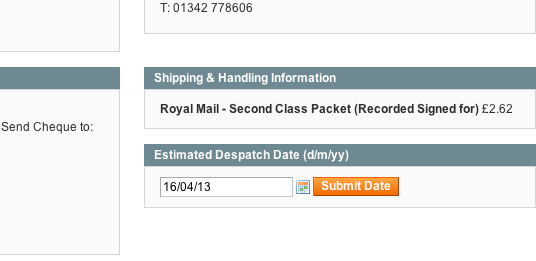
The image shows the new despatch date field as it will appear immediately below Shipping & Handling Information in the Order View for each customer.
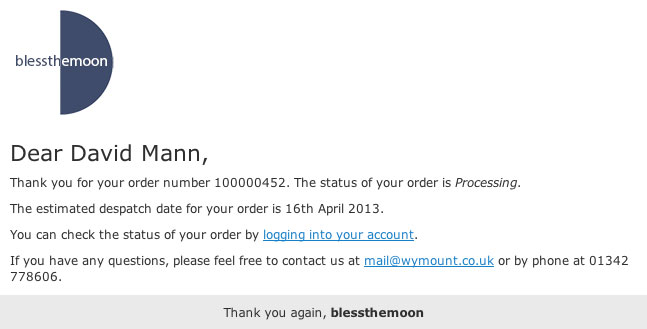
The contents of the email including the new despatch date field are shown next.
Why choose this example for this series of posts. Well, this example will allow us to see many interesting aspects of Magento development in action. We’ll see module setup and alternative approaches to capturing the date. It’ll give us opportunities to see module components working together: blocks, models and controllers. We’ll see what both Jquery and Prototype can bring to the party. Along the way, we’ll touch on formatting our output, sessions, and contrast between doing things for Admin versus for frontend – among a host of other interesting Magento topics.
Along the way I’ll endeavour to credit those who have gone before in documenting the various aspects that we’ll cover, and try not to miss anyone.
Setup
In creating our module there are a several essentials we need to take care of. We need a directory structure on which we’ll hang the files comprising the module, and we’ll need to create the files.
There are Magento extensions that will take care of setting up the directories and populating them with files of default code – as a starting point. One of these is Module Creator by Daniel Nitz. As of the date of this post however, Module Creator will require some tweaking to make it work with the latest version of Magento 1.7.0.2. Generally using a module creator is a time saver, particularly as getting the code syntax right can be a headache. Module creation extensions can be added manually or via Magento Connect Manager if available there. Personally I prefer to use my own bare bones template which forms the starting point for any new Magento module.
For the purpose of our understanding in this post we’ll create the directory structure and module files from scratch. We need a name for the module and a unique name which will act as a group name into which all our modules can be grouped, referred to as the namespace (a.k.a packagename). The namespace will be the name of the directory containing subdirectories for each of our modules. The namespace for this exercise will be Blessthemoon, and we’ll override and extend Magento’s core functionality with the functionality contained in a module we’ll name Despatchdate. Despatchdate will be the name of the directory within the BlesstheMoon directory thus app/code/local/Blessthemoon/Despatchdate, and this will override and extend Magento core functionality of modules contained within app/code/core/Mage directory.
OK, let’s create these directories. Personally, I’ll always have a diagram of the directory structure which I’ll store along with the code. The diagram shows the directores we need to create in orange and the two files we’ll create in this post in red. We’ll extend this diagram in future posts as we add the files we need to complete the module. 
As the diagram shows we could have created our namespace and module under ‘core’, under ‘community’ or under ‘local’. But as a rule we shouldn’t amend core files as core functionality would then be lost irreversibly, and in the event of upgrading Magento the changes that we’d made would be lost anyway. Community modules are generally created by third parties and stored under community. They override core functionality. However, if we place our modules in local, we override community and core functionality. Handy in the event that we want to tweak community sourced modules without amending them. Modules created specifically for our site are as a rule stored under local.
OK, lets add some code to get our module underway. In this post we’ll create the bare minimum to bring a module into existence with two xml files: Blessthemoon_Despatchdate.xml and config.xml.
Generally when developing its best to turn caching off. That way our changes are reflected immediately in the site. Turn caching off within Admin with System : Cache Management, and then Select All. Then select Action Disable and click submit.
Blessthemoon_Despatchdate.xml
The name Blessthemoon_Despatchdate.xml comprises our namespace followed by underscore followed by the module name. This is the convention. It must be stored in the app/etc/modules directory. Its job is to specify the new module name, indicate whether active and designate the code pool. As stated earlier, this module is in the local pool.
Here’s the code:
1<?xml version=’1.0′?>
2<config>
3<modules>
4<Blessthemoon_Despatchdate>
5<active>true</active>
6<codePool>local</codePool>
7</Blessthemoon_Despatchdate
8</modules>
9</config>
config.xml
The second file we need is config.xml and this resides in the app/code/local/Blessthemoon/Despatchdate/etc/ directory. Its purpose is to tell Magento all about our module: models, resources, helpers, layout, routers and more. The following code is the minimum we’ll need to declare our module. We’ll add to this as we go through this series of posts.
1<?xml version=’1.0′?>
2<config>
3<modules>
4<Blessthemoon_Despatchdate>
5<version>0.1.0</version>
6</Blessthemoon_Despatchdate>
7</modules>
8</config>
That’s it. We’ve identified our module and given it a version number. We can check that our module exists by going to Admin and selecting System : Configuration : Advanced : Advanced. Our module should be listed along with all other available modules. See you in the next post.