This is the post at the heart of this series. The controller will take the values entered into the input form, save the despatch date in the database and provide messages on the status of the success or failure of this action.
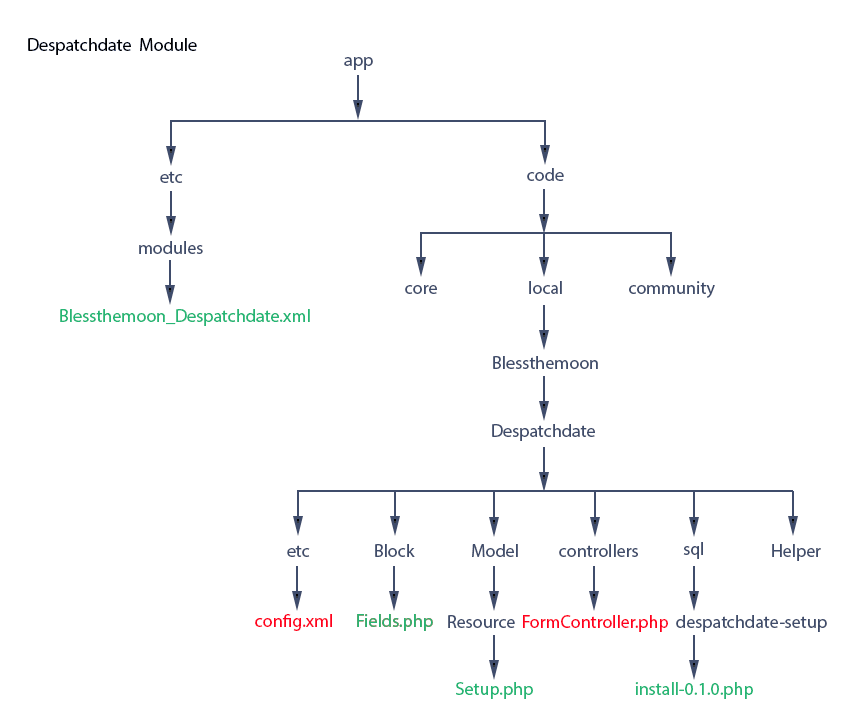
We will need to make changes to config.xml to identify our controller and build the controller Blessthemoon/Despatchdate/controllers/FormController.php, both shown in red.
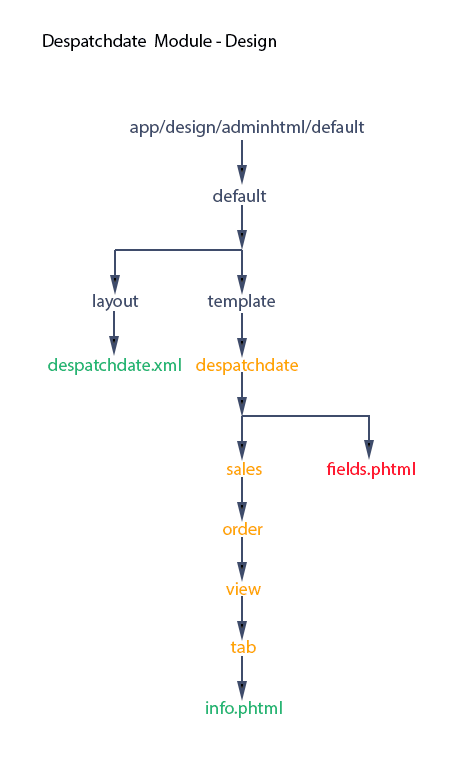
We’ll also see that further additions will be necessary to the template app/design/adminhtml/default/default/template/despatchdate/fields.phtml.
With the big picture in mind, let’s now identify the controller in config.xml shown in red. We’ve also taken the opportunity to reorganise a little, reordering our basic sections as ‘modules’, ‘global’, ‘admin’, then ‘adminhtml’.
1<?xml version=”1.0″?>
2<config>
3<modules>
4<Blessthemoon_Despatchdate>
5<version>0.1.0</version>
6</Blessthemoon_Despatchdate>
7</modules>
8<global>
9<blocks>
10<despatchdate>
11<class>Blessthemoon_Despatchdate_Block</class>
12</despatchdate>
13</blocks>
14<resources>
15<despatchdate_setup>
16<setup>
17<module>Blessthemoon_Despatchdate</module>
18<class>Blessthemoon_Despatchdate_Model_Resource_Setup </class>
19</setup>
20</despatchdate_setup>
21</resources>
22</global>
23<admin>
24<routers>
25<despatchdate>
26<use>admin</use>
27<args>
28<module>Blessthemoon_Despatchdate</module>
29<frontName>despatchdate</frontName>
30</args>
31</despatchdate>
32</routers>
33</admin>
34<adminhtml>
35<layout>
36<updates>
37<despatchdate>
38<file>despatchdate.xml</file>
39</despatchdate>
40</updates>
41</layout>
42</adminhtml>
43</config>
We use ‘router’ not ‘controllers’! And note we use the ‘routers’ tag within ‘adminhtml’ not ‘admin’.
We also want to amend our template form fields.phtml before tackling the controller. See the changes in red.
With these changes, we’ve chosen to post two additional values to our controller.
Using the method getUrl(), which we saw in part 2 of this series, we’re posting the url of this page. We’ll deploy this in our controller as a simple way of redirecting back to this page. The second parameter array(‘_current’ => true) specifies ‘_current’ as ‘true’ which will construct the url with the current module, controller, action and any parameters, i.e. the order id in this case.
We’re also posting the current record id. We’ve done this using $this->getRequest()->getParam(‘order_id’), which gets the value of the order id from the the current url.
We’re ready to build the controller. Let’s start simple to ensure our controller is working.
1?php
2
3class Blessthemoon_Despatchdate_FormController extends Mage_Adminhtml_Controller_Action
4{
5public function postAction()
6{
7echo “hello”;
8}
9}
The controller class Blessthemoon_Despatchdate_FormController extends Mage_Adminhtml_Controller_Action with an ultimate ancestor Mage_Core_Controller_Varien_Action.
Having made the changes in this post, enter a valid date into the despatch date field on the order view page, and you should be greeted with ‘hello’, and the new url should reflect the module name, controller class and action method that we submitted’ i.e. ‘despatchdate/form/post/’. We should also see ‘key/’ followed by the key value. We discussed this in part 2 of this series. Without this key value, we’d be redirected to the dashboard, not to our controller as wished.
Now lets populate the controller with the code we need, and then we’ll go through the important parts.
1<?php
2
3class Blessthemoon_Despatchdate_FormController extends Mage_Adminhtml_Controller_Action
4{
5public function postAction()
6{
7try {
8$estdate = $this->getRequest()->getParam(‘estDate’);
9if (empty($estdate)) {
10Mage::throwException($this->__(‘Invalid date. Please check & resubmit.’));
11}
12$components = explode(“/”, $estdate);
13if (strlen($components[0])<2)
14{
15$components[0]= “0”.$components[0];
16}
17if (strlen($components[1])<2)
18{
19$components[1]= “0”.$components[1];
20}
21if (strlen($components[2])<4)
22{
23$components[2]= “20”.$components[2];
24}
25$estdate = $components[2].”/”.$components[1].”/”.$components[0];
26
27$recordId = $this->getRequest()->getParam(‘record_id’);
28$orderModel = Mage::getModel(‘sales/order’)->load($recordId);
29$orderModel->setEstdate($estdate)->save();
30
31$message = $this->__(‘The estimated despatch date has been submitted successfully.’);
32Mage::getSingleton(‘adminhtml/session’)->addSuccess($message);
33$url = $this->getRequest()->getParam(‘url’);
34Mage::app()->getFrontController()->getResponse()->setRedirect($url);
35} catch (Exception $e) {
36Mage::getSingleton(‘adminhtml/session’)->addError($e->getMessage());
37$url = $this->getRequest()->getParam(‘url’);
38Mage::app()->getFrontController()->getResponse()->setRedirect($url);
39}
Magento allows us to add messages to a session array. When a page is rendered Magento references the session array, and displays the message relevant to this particular page. There’s a div with an ID of ‘messages’ where the message is displayed on the page. By inspecting the html, you can see this div immediately above the order number on the Order View page.
To create a custom message, we add Mage::getSingleton(‘adminhtml/session’)->addSuccess($message) or Mage::getSingleton(‘adminhtml/session’)->addError($message) to our code. You can see this code on lines 32 and 36 of FormController.php above. There are also addNotice() and addWarning() methods. The type of message used determines the format of the message. When a subsequent page is rendered the message clears.
Our controller deploys ‘try-catch’ to deal with errors encountered in ‘try{}’ and display those in ‘catch{}’ with Mage::getSingleton(‘adminhtml/session’)->addError($e->getMessage()). The error object is passed to the $e parameter of ‘catch’ and we can then access the error message with $e->getMessage(). Note that ‘try-catch’ is a great debugging tool. For example, we could echo $e->getTraceAsString() to display the code that led to the error.
We can send error messages explicitly to ‘catch’ following an error using ‘Mage::throwException($this->__(”)), as we do on line 10. This is a belts-and-braces check that the the ‘estdate’ parameter posted to this controller is not empty.
We need to explain that we obtain the values of our posted parameters with $this->getRequest()->getParam(”) as we’ve done on lines 8, 27, 33 and 37.
Once gotten, we reverse ‘estdate’ supplied and validated as either ‘dd/mm/yy’ or ‘dd/mm/yyyy’ to store in the database as ‘yyyy/mm/dd’. which gives us the ability to order the column.
We use ‘Mage::getModel(‘sales/order’)->load($recordId)’ in line 28 to load the record with the ID we’ve obtained from the post. Then in line 29, we save the value of ‘$estdate’ into this record using the setter setEstdate for the ‘estdate’ column.
At the end of either ‘try’ or ‘catch’ depending on success or failure, we use Mage::app()->getFrontController()->getResponse()->setRedirect($url)’ to redirect us to the Order View page with the url we posted to this controller.
That’s it, enter a valid date into the despatch date field on the Order View page to test the controller to see if all good. You’ll want to peek (with phpMyAdmin or alternative) into the ‘estdate’ column of the ‘sales_flat_order’ table to make sure that the row has been populated for the order ID you were in (‘increment_id’ in the table). Hopefully, that all went well. If not please recheck the code and comment below if still confused.
Next we get the ‘estdate’ value from the table to display in the Order View page. For that we’ll be adding some code to this module’s block class. See you in part 6.