This post continues our series to build a module for order despatch date. Here, we want to develop our store so that we can communicate the estimated despatch date to the customer in an email. Magento provides the facility to send an order update email from within the Order View Information page. We’ll add an estimated despatch date to this email template and serve the template with a method to get the date from the database.
Here’s a reminder of the email, we want to send the customer informing them of the estimated despatch date for the order.
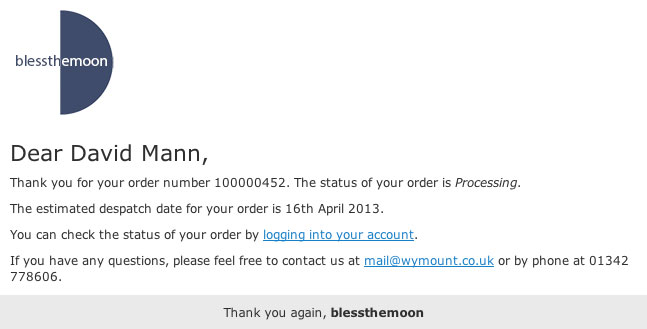
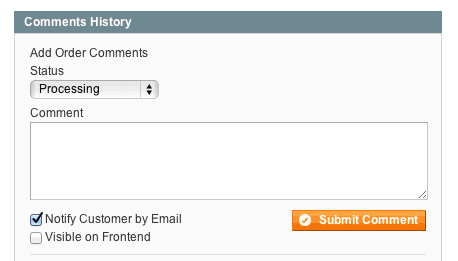
Site administrators can send this email from within the Order View Information page by ticking ‘Notify Customer by Email’ and then clicking ‘Submit Comment’ (as shown in the next image). Optionally, the administrator can type a comment into the ‘Comment’ field, and this will also appear in the email, at least that’s the way the email template is set up by default. We’ll retain that functionality, as we’ll see in a moment when we customise the template, and we’ll have the optional comment appear immediately after the line in the email which reads ‘The estimated despatch…’.
Before we look at customising the template, we will need to create a method which we’ll call from within the template to display the date, and in the format we want it. To do this we’re going to make some changes to our module. We’ll add a directory ‘Sales’, shown in orange, and as shown in red, add a file ‘Order.php’ with a new model class and make changes to ‘config.xml’ to identify this new class.
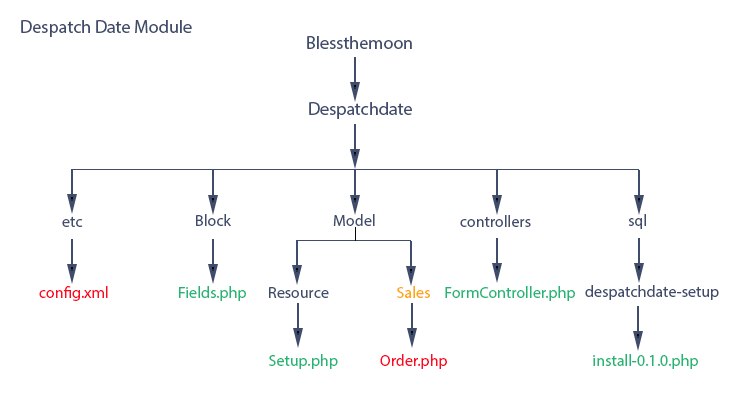
Template variables call methods in the ‘sales/order model’, i.e. in ‘Mage_Sales_Model_Order’, and in the ancestor classes that ‘Mage_Sales_Model_Order’ extends. Of course, we won’t want to edit the class itself, so we’ll extend it, and define the method we want within the new class. The ‘Mage_Sales_Model_Order’ class is defined in app/code/core/Mage/Sales/Model/Order.php, so for the sake of good organisation, we’ll mirror the Sales/Order.php structure in our module. We’ll create the ‘Sales’ directory under ‘Model’ and ‘Order.php’ under that. Here’s the code for Order.php.
1<?php
2
3class Blessthemoon_Despatchdate_Model_Sales_Order extends Mage_Sales_Model_Order
4{
5public function getDateFormatted()
6{
7$estdate = ” “.$this->getEstdate();
8if (strlen($estdate)>1){
9$dateparts = explode(“/”,trim($estdate));
10$daysuffix = ‘th’;
11if (($dateparts[2]==’01’) || ($dateparts[2]==’21’) || ($dateparts[2]==’31’)){
12$daysuffix = ‘st’;
13}
14if (($dateparts[2]==’02’) || ($dateparts[2]==’22’)){
15$daysuffix = ‘nd’;
16}
17if (($dateparts[2]==’03’) || ($dateparts[2]==’23’)){
18$daysuffix = ‘rd’;
19}
20$month = array(“zero”,”January”,”February”,”March”,”April”,”May”,”June”,”July”,”August”,”September”,”October”,”November”,”December”);
21$year = $dateparts[0];
22$estdateformatted = ‘The estimated despatch date for your order is ‘.intval($dateparts[2]).$daysuffix.” “.$month[intval($dateparts[1])].” “.$year.”.”;
23return $estdateformatted;
24}
25}
26}
27
You can see in line 5 that we’ve chosen a name for our method. This is what we’ll need to call in our email template. In line 7 the instantiated object of the model (‘$this’) uses the ‘estdate’ getter ‘getEstdate’. If we’ve gotten something then the condition in line 8 is false and the method returns nothing. If however we get a date, then with ‘explode’ and a little string handing we’ll return ‘The estimated despatch date for your order is date.’
Ok that’s fine but we need to identify the class in our module’s config.xml. Here’s the additional code shown in red:
1<?xml version=”1.0″?>
2<config>
3<modules>
4<Blessthemoon_Despatchdate>
5<version>0.1.0</version>
6</Blessthemoon_Despatchdate>
7</modules>
8<global>
9<blocks>
10<despatchdate>
11<class>Blessthemoon_Despatchdate_Block</class>
12</despatchdate>
13</blocks>
14<models>
15<sales>
16<rewrite>
17<order>Blessthemoon_Despatchdate_Model_Sales_Order</order>
18</rewrite>
19</sales>
20</models>
21<resources>
22<despatchdate_setup>
23<setup>
24<module>Blessthemoon_Despatchdate</module>
25<class>Blessthemoon_Despatchdate_Model_Resource_Setup </class>
26</setup>
27</despatchdate_setup>
28</resources>
29</global>
30<admin>
31<routers>
32<despatchdate>
33<use>admin</use>
34<args>
35<module>Blessthemoon_Despatchdate</module>
36<frontName>despatchdate</frontName>
37</args>
38</despatchdate>
39</routers>
40</admin>
41<adminhtml>
42<layout>
43<updates>
44<despatchdate>
45<file>despatchdate.xml</file>
46</despatchdate>
47</updates>
48</layout>
49</adminhtml>
50</config>
As we’re extending the ‘Mage/Sales’ module, we specify the ‘<sales>’ tag within ‘<models>’, i.e. within the ‘models’ type of class that we are extending. Then within the ‘<rewrite>’ tags, we use tags to complete the name of the class we’re extending, i.e. ‘<order>’ completes ‘Mage_Sales_Model_Order’ defined in /app/code/core/Mage/Sales/Model/Order.php. The new class is specified between the ‘<order>’ tags.
Everything is set behind the scenes, now we can customise the email template with its variable call to our new method. To access the ‘order update’ email template, we login to Admin and select ‘System/Transactional Emails’. Select the ‘order update’ template. This is the html we want to achieve the email output at the top of this post.
1 <body style=”background:#F6F6F6; font-family:Verdana, Arial, Helvetica, sans-serif; font-size:12px; margin:0; padding:0;”>
2 <div style=”background:#F6F6F6; font-family:Verdana, Arial, Helvetica, sans-serif; font-size:12px; margin:0; padding:0;”>
3 <table cellspacing=”0″ cellpadding=”0″ border=”0″ height=”100%” width=”100%”>
4 <tr>
5 <td align=”center” valign=”top” style=”padding:20px 0 20px 0″>
6 <!– [ header starts here] –>
7 <table bgcolor=”#FFFFFF” cellspacing=”0″ cellpadding=”10″ border=”0″ width=”650″ style=”border:1px solid #E0E0E0;”>
8 <tr>
9 <td valign=”top”><a href=”{{store url=””}}”><img src=”{{skin url=”images/logo_email.gif” _area=’frontend’}}” alt=”” border=”0″/></a></td>
10 </tr>
11 <!– [ middle starts here] –>
12 <tr>
13 <td valign=”top”>
14 <h1 style=”font-size:22px; font-weight:normal; line-height:22px; margin:0 0 11px 0;”>Dear {{htmlescape var=$order.getCustomerName()}},</h1>
15 <p style=”font-size:12px; line-height:16px; margin:0 0 10px 0;”>
16 Thank you for your order number {{var order.increment_id}}. The status of your order is <span style=”font-style: italic;”>{{var order.getStatusLabel()}}</span>.
17 </p>
18 <p style=”font-size:12px; line-height:16px; margin:0 0 10px 0;”>
19 {{var order.getDateFormatted()}}
20 </p>
21 <p style=”font-size:12px; line-height:16px; margin:0 0 10px 0;”>{{var comment}}</p>
22 <p style=”font-size:12px; line-height:16px; margin:0 0 10px 0;”>You can check the status of your order by <a href=”{{store url=”customer/account/”}}” style=”color:#1E7EC8;”>logging into your account</a>.</p>
23 <p style=”font-size:12px; line-height:16px; margin:0;”>
24 If you have any questions, please feel free to contact us at
25 <a href=”mailto:{{config path=’trans_email/ident_support/email’}}” style=”color:#1E7EC8;”>{{config path=’trans_email/ident_support/email’}}</a>
26 or by phone at 01342 824949.
27 </p>
28 </td>
29 </tr>
30 <tr>
31 <td bgcolor=”#EAEAEA” align=”center” style=”background:#EAEAEA; text-align:center;”><center><p style=”font-size:12px; margin:0;”>Thank you again, <strong>{{var store.getFrontendName()}}</strong></p></center></td>
32 </tr>
33 </table>
34 </td>
35 </tr>
36 </table>
37 </div>
38 </body>
You’ll note that Magento uses table tags, and the CSS is inline. For those new to email Html this may look a little antiquated, but I haven’t changed this. We’d like to use more elegant CSS, but a host of email applications out there don’t like it, so we’re stuck with the CSS of a bygone era. More important in terms of this post is the presence of a number of variables highlighted in orange which call methods in our order model. {{var comment}} is an interesting one because this pulls in a comment if one has been entered for this email, as mentioned earlier in this post. There’s a reference here for variables available to us for transactional emails as needed.
In red you can see the custom variable we need to call our newly created method: {{var order.getDateFormatted()}}. Notice the dot syntax. No ‘->’ here. If you’re following along, then format the email template as I’ve shown here and ‘Save Template’.
There’s one other thing to note. ‘Order Comments’ must be enabled in ‘Sales Emails’ in Admin’s ‘System/Configuration’ settings. Once done, we can test that our email has the new format and importantly, our formatted despatch date field.
That’s all for this post. In the next, we’ll look at the order grid page, and how we can include despatch date as a new column.