In this series of posts we’re going to considerably extend customer registration for our site. Along the way we’re going to see how easy it is to add fields to the various input forms of our site using the power of Magento’s EAV database. If that sounds like fun, read on.
The site in question is a B2B site selling jewellery wholesale. Customers can only make purchases on the site if they have set up an account and login. Much of the site including price information is unavailable to them.
For example, in template/catalog/product/list.phtml which lists products, we make this check before displaying the price.

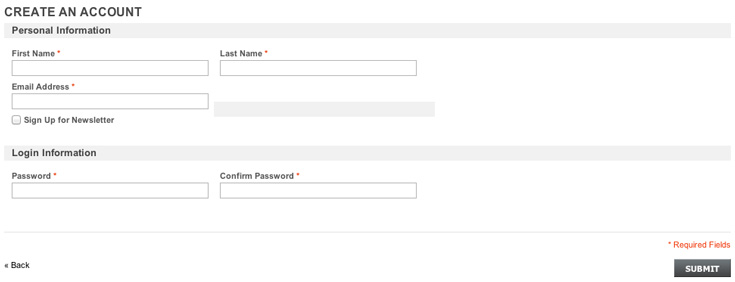
The client wants more extensive registration. Currently, registration is limited to the following fields:
What they had in mind was this:
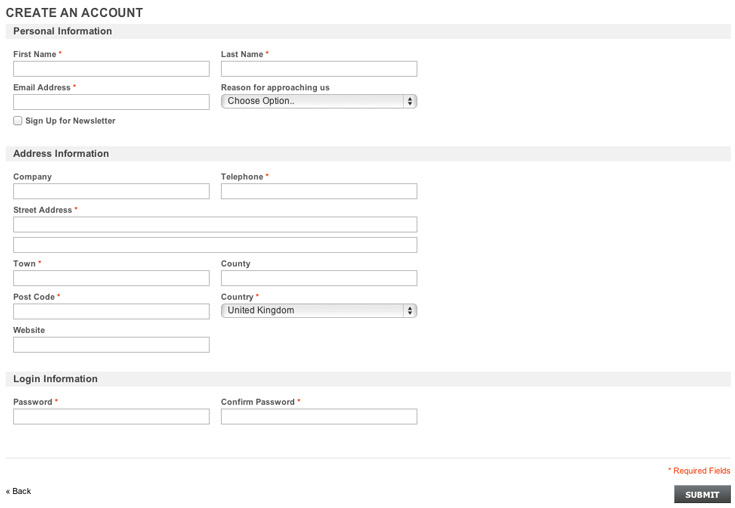
Capturing this amount of information upfront would negate the need to email the prospect for further information before activating their account.
As you can see ‘Reason for approaching us’ is a select field. The client would also like the ability to specify and update the select options themselves.
Of course, they also want these fields to be updatable in other forms around the site, in both Admin and Frontend. Many of the address fields are already of course.
But in particular, ‘Reason for approaching us’ should be available in Admin Account setup and edit in both Admin Manage Customers and Admin Create New Order. Customers should also be able to change in frontend in Customer Account.
The new field ‘website’ should be available for setup and edit in Admin Manage Customers, Admin Create New Order and in Customer Account too, but also within Billing & Shipping Address in Admin Orders and in Frontend Checkout. We’d better get started!
It all sounds like quite a bit of work (and quite a bit of blogging). But we can achieve quite a lot with relatively little effort to get us started. Here’s how:-
Take a look inside register.phtml. In later versions of Magento this is found inside template/persistent/customer/form/. Find the lines <?php if($this->getShowAddressFields()): ?> and <?php endif; ?>. Note that between these line are many of the fields we want to display in our registration form. The input tags are already there for ‘company’, ‘telephone’, ‘street’, ‘city’ (‘town’), ‘region’ (‘county’), ‘postcode’ and ‘country’. (Of course, we will have to have translated the labels for a UK site with the appropriate entries in themefolder/locale/translate.csv.) But how do we display these input fields in our form? Currently, getShowAddressFields() is set to ‘FALSE’ and the conditional ensures we skip the lines we want. The cleanest approach without touching any of this either within core files or within our theme folder is to use the setShowAddressFields method to set showAddressFields to ‘TRUE’ and we can do this within local.xml.
local.xml to the rescue
In an earlier blog we discussed local.xml. Here’s what we need to add.
1<customer_account_create>
2<reference name=”customer_form_register”>
3<action method=”setShowAddressFields”><value>true</value></action>
4</reference>
5</customer_account_create>
Here we target the <customer_account_create> page, and reference the block object named “customer_form_register”. If you’re nosy, you can see <block type=”customer/form_register” name=”customer_form_register” template=”customer/form/register.phtml” /> in customer.xml, and an update to that in persistent.xml: <action method=”setTemplate”><template>persistent/customer/form/register.phtml</template></action>. Finally, we use the action method setShowAddressFields to set showAddressFields to ‘true’ and voilà.
Well that takes care of many of the fields required leaving us with ‘Reason for approaching us’ and ‘website’ to deal with. And these fields are what we’ll be tackling in the remainder of this series.
Getting a handle on EAV
We’re going to need to add these fields as new attributes. In an earlier blog we added ‘despatch date’ as an attribute to ‘order’. This was essentially adding a new column to the sales_flat_order table. We’re not surprised that sales-flat-order has lots of columns in it relating to order, such as customer_lastname, subtotal_incl_tax and billing_address_id. After all this is a regular entity of the type we’d expect to find in a relational database.
In an earlier blog, we described how we could relate this and the sales_flat_order_address table to the sales_flat_order_grid table using SQL joins.
So you’d think all we need to do in adding the attributes ‘Reason for approaching us’ and ‘website’ to the database is find the entities for ‘customer’ and ‘customer_address’ and add the respective column. Not so fast. These entities do exist. If you’ve access to a Magento database, take a look at the customer_entity and the customer_address_entity tables. These contain rows for all the customers and customer addresses in the database respectively. But, and this is the thing, where are the columns you’d expect to find for these entities? Columns like first name and last name in customer_entity and street and post code in customer_address_entity. Just not there.
Well this an EAV model, and although the order entity was different (along with invoice, credit memo and shipment by the way), the customer and customer address entities follow EAV model principles. (And also note that the catalog category and catalog product entities follow EAV principles too.) Well the ‘E’ stands for Entity, and we’ve just noted where the entities are in the database. ‘A’ stands for attribute. The attributes are not the names of the columns in the entity tables. They’re actually stored as rows in a separate table called eav_attribute.
Take a look at that table and get to know it well. It’s at the very heart of the EAV model. It contains the attributes for all entities in the model stored as rows. It’s here you’ll find firstname, lastname, street and postcode, and details for those attributes such as backend_type (varchar, int, text etc) and which entity type each belongs to. For example, firstname in the eav_attribute table has entity_type_id 1 which means it belongs to the customer entity. ‘Street’ has entity_type_id 2 which means it belongs to the customer_address entity.
Finally the ‘V’ in EAV stands for value. Attribute values are stored against an attribute_id in the appropriate value table belonging to that entity (not then in the entity table itself). Values for each entity for each ‘backend_type’ are stored into separate data type tables: ‘varchar’, ‘int’, ‘text’, ‘datetime’ and ‘decimal’. So a value for the varchar firstname gets stored in the customer_entity_varchar table.
When details are captured into some input form in the site for a new entity, say last name and dob (date of birth) for a customer, then in simplified terms this is what happens. One new row is populated in the customer_entity table with a new entity_id (say 280) and an entity_type_id (of 1 for customer entity). Now lastname in the eav_attribute table has ‘7’ as its attribute_id and ‘varchar’ as the backend type. So the new lastname value (‘Smith’) gets stored in the customer_entity_varchar table with an entity_type_id of ‘1’, an attribute_id of ‘7’ and an entity_id of ‘280’. Similarly, from the eav_attribute table, dob has ’11’ as its attribute_id and ‘datetime’ as the backend_type. So the new dob value (‘1971-07-31 00:00:00’) gets stored in the customer_entity_datetime table with an entity_type_id of ‘1’, an attribute_id of ’11’ and an entity_id of (again) ‘280’.
That’s EAV in a nutshell. In the next post we’ll see how to add the attributes we need to the database, and we’ll see the power of Magento in allowing us to add these without extensive coding to the forms throughout the site. In a subsequent post, we’ll see the power of the ‘source_model’ field in the eav_attribute table in allowing us to create select fields in our forms.