It’s time for some real action. In this post we’re going to see how to add attributes in our EAV database model. We’ll build install and upgrade files which do the heavy lifting including giving Admin and Frontend access to our new fields throughout our site for create and update.
Note in this series of posts I’m using Magento CE version 1.7.0.2.
First, we’ll need a module so that we can run install-0.1.0.php. I covered module setup and using install and upgrade in previous posts.
As a reminder, you’ll need a config.xml with a resources tag that identifies the module and the class. In this case we’ll use the existing class Mage_Customer_Model_Entity_Setup.
1<?xml version=”1.0″?>
2<config>
3<modules>
4<Blessthemoon_Exploration>
5<version>0.1.0</version>
6</Blessthemoon_Exploration>
7</modules>
8<global>
9<resources>
10<exploration_setup>
11<setup>
12<module>Blessthemoon_Exploration</module>
13<class>Mage_Customer_Model_Entity_Setup</class> <!– existing class! –>
14</setup>
15<connection>
16<use>core_setup</use>
17</connection>
18</exploration_setup>
19</resources>
20</global>
21</config>
Next we’ll need an install file with the name install-0.1.0.php. The file name must include the version 0.1.0 specified in config.xml. See the relevant post if this is a little hazy.
We’ll cover this in bite sized chunks. This install file only covers the new attribute ‘website’ at this stage. We’ll use an upgrade file to add the new field for ‘Reason for approaching us’ later.
1<?php
2$installer = $this;
3
4$installer->startSetup();
5
6$this->addAttribute(‘customer_address’, ‘website’, array(
7‘type’ => ‘varchar’,
8‘input’ => ‘text’,
9‘label’ => ‘Website’,
10‘source’ => ”,
11‘global’ => 1,
12‘visible’ => 1,
13‘required’ => 0,
14‘user_defined’ => 1,
15‘visible_on_front’ => 1
16));
17Mage::getSingleton(‘eav/config’)
18->getAttribute(‘customer_address’, ‘website’)
19->setData(‘used_in_forms’, array(‘customer_register_address’,’customer_address_edit’,’adminhtml_customer_address’))
20->save();
21
22$installer->endSetup();
We’re going to use much of this post to explore the contents and the consequences of this file.
Note addAttribute in line 6. The addAttribute method takes 3 arguments as can be seen in Mage_Eav_Model_Entity_Setup. (The resources class specified in our config.xml file, Mage_Customer_Model_Entity_Setup, extends Mage_Customer_Model_Resource_Setup, which in turn extends Mage_Eav_Model_Entity_Setup.) The addAttribute function looks like this: addAttribute($entityTypeId, $code, array $attr). The first argument is entity type. In this case, it’s customer_address. If you want to see other entity types, take a look in the eav_entity_type table. We also discussed entity types in the previous post. The second argument is the name of the new attribute we want in this entity, i.e. ‘website’. Then as third argument, we specify an array containing the attribute’s properties. Note the type is varchar, hence values for this attribute will be stored in the customer_address_entity_varchar table. The ‘source’ is specified as blank here, but I’ll be focussing on source models in a later post when we look at the select field for ‘Reason for approaching us’.
That’s it for setting up the attribute. When we refresh any page on our site, this version of install will run (the core_resource table will be updated – see this post if you’re unsure why), and a row for the new ‘website’ attribute will be created in the ‘eav_attribute’ table. Because we’ve added an attribute for customer_address, the entity_type_id is shown as 2 for this attribute in eav_attribute.
There are 4 types of entity in this table: 1 = customer, 2 = customer_address, 3 = catalog_category and 4 = catalog_product. Entity types for order, invoice, creditmemo and shipping are not included in eav_attribute, because they use flat tables outside the core EAV model.
When we run install there’s also a row added to the ‘customer_eav_attribute’ table which comprises further properties for customer_address and customer attributes. For example, there’s a sort_order property for specifying the order of fields displayed in forms where the order can’t be specified in the template file. As an aside, there’s also a ‘catalog_eav_attribute’ table which comprises further properties for catalog_category and catalog_product with fun properties like is_searchable and is_comparable, but that’s a topic for another post…
Setting the form codes for ‘website’
The more interesting aspect of this file is in lines 17 through 20. Here we set the form codes for the website attribute (for the attribute property ‘used_in_forms’). We’re specifying the forms in which we want our attribute to appear, and also to be saved when the user (Admin or customer) presses ‘submit’. The client’s requirement as mentioned in part 1 of this series is for ‘website’ to appear in the forms identified in the left column of the following table. The form codes we need to specify in the second argument array of setData() (row 19) are identified as this table’s column headings.
‘website’ attribute – mapping of form to form code
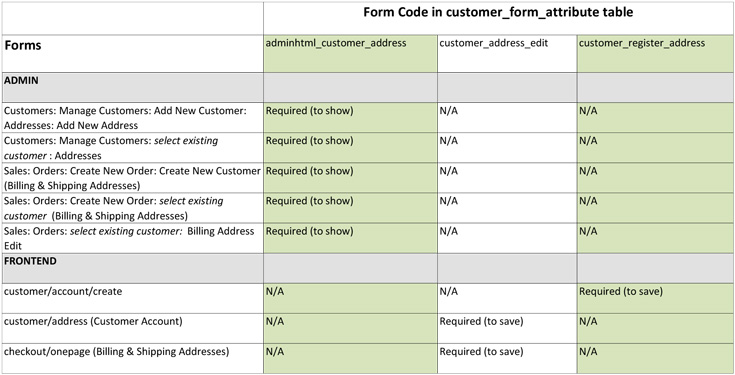
The Frontend forms of the table will also require that we add input tags to the appropriate template file which will then show the input field in the respective page. But unless we specify the appropriate form code for that form for the new attribute ‘website’, the field value won’t save with the form. We’ll amend template files for two of the three frontend forms required in a moment.
The Admin forms will show without the need to amend templates. But again they will require that we specify the form code here in our install file. Specifying the form code in setData() in the install file is the very powerful way that Magento provides for having attributes associated with forms without extensive coding on our part.
Posting the forms
Skip this paragraph unless you’re interested in a digression about controllers. Take a look at the controllers for posts from the forms ‘customer/account/create’ (customer registration) or ‘customer/address’ (Customer Account), and you can see how they set form codes as ‘customer_register_address’ and ‘customer_address_edit’ respectively, and only save posted parameters (via getRequest()) that match these form codes. You can get to the controller for customer registration by noting the form action $this->getPostActionUrl() in ‘template/persistent/customer/form/register.phtml’. Follow this to the associated block file Mage/Customer/Block/Form/Register.php, which via a helper returns the routing ‘customer/account/createpost’, hence the controller Mage/Customer/controllers/AccountController.php and its method createPostAction.
When we run setData(‘used_in_forms’,…) in this version of install, three rows for the ‘website’ attribute_id are added to the customer_form_attribute table for ‘customer_register_address’, ‘customer_address_edit’ and ‘adminhtml_customer_address’.
We should also be able to see the new input field in our Admin forms as noted in the left column in the mapping table above. We don’t yet see our field in the frontend forms. Next we want to update the theme folder template files to make this happen.
Updating the templates
Let’s start with the template for customer registration (‘customer/account/create’). We’ll need to add the following in red to ‘template/persistent/customer/form/register.phtml’ to put the field where we want it.
113<?php if($this->getShowAddressFields()): ?>
114<div class=”fieldset”>
115<input type=”hidden” name=”create_address” value=”1″ />
116<h2 class=”legend”><?php echo $this->__(‘Address Information’) ?></h2>
117<ul class=”form-list”>
:
170<li class=”fields”>
171<div class=”field”>
172<label for=”zip” class=”required”><em>*</em><?php echo $this->__(‘Zip/Postal Code’) ?></label>
173<div class=”input-box”>
174<input type=”text” name=”postcode” value=”<?php echo $this->escapeHtml($this->getFormData()->getPostcode()) ?>” title=”<?php echo $this->__(‘Zip/Postal Code’) ?>” id=”zip” class=”input-text validate-zip-international <?php echo $this->helper(‘customer/address’)->getAttributeValidationClass(‘postcode’) ?>” />
175</div>
176</div>
177<div class=”field”>
178<label for=”country” class=”required”><em>*</em><?php echo $this->__(‘Country’) ?></label>
179<div class=”input-box”>
180<?php echo $this->getCountryHtmlSelect() ?>
181</div>
182</div>
183</li>
184<li class=”fields”>
185<div class=”field”>
186<label for=”website”><?php echo $this->__(‘Website’) ?></label>
187<div class=”input-box”>
188<input type=”text” name=”website” value=”<?php echo $this->escapeHtml($this->getFormData()->getWebsite()) ?>” title=”<?php echo $this->__(‘Website’) ?>” id=”website” class=”input-text” />
189</div>
190</div>
191</li>
192</ul>
193<input type=”hidden” name=”default_billing” value=”1″ />
194<input type=”hidden” name=”default_shipping” value=”1″ />
195</div>
196<?php endif; ?>
Nothing too sinister here hopefully. We’ve mirrored the classes for other input tags to keep things uniform. Lets do similar now for Customer Account (‘customer address’). Again, necessary changes are shown in red for the relevant template: ‘customer/address/edit.phtml’.
41<div class=”fieldset”>
42<?php echo $this->getBlockHtml(‘formkey’)?>
42<input type=”hidden” name=”success_url” value=”<?php echo $this->getSuccessUrl() ?>” />
42<input type=”hidden” name=”error_url” value=”<?php echo $this->getErrorUrl() ?>” />
42<h2 class=”legend”><?php echo $this->__(‘Contact Information’) ?></h2>
42<ul class=”form-list”>
:
56<li class=”fields”>
57<div class=”field”>
58<label for=”telephone” class=”required”><em>*</em><?php echo $this->__(‘Telephone’) ?></label>
59<div class=”input-box”>
60<input type=”text” name=”telephone” value=”<?php echo $this->escapeHtml($this->getAddress()->getTelephone()) ?>” title=”<?php echo $this->__(‘Telephone’) ?>” class=”input-text <?php echo $this->helper(‘customer/address’)->getAttributeValidationClass(‘telephone’) ?>” id=”telephone” />
61</div>
62</div>
63<div class=”field”>
64<label for=”website” ><?php echo $this->__(‘Website’) ?></label>
65<div class=”input-box”>
66<input type=”text” name=”website” value=”<?php echo $this->escapeHtml($this->getAddress()->getWebsite()) ?>” title=”<?php echo $this->__(‘Website’) ?>” id=”website” class=”input-text” />
67</div>
68</div>
69</li>
70</ul>
71</div>
Note although the ‘telephone’ field uses getAttributeValidationClass(‘telephone’) for validation, we’ve made no provision for website. We’ll come back to validation in a later post for this series.
Conclusion
With relatively little coding, the ‘website’ attribute is available in all the forms required in Admin and Frontend, except in checkout. We’ll tackle checkout in the next post.
What have we achieved in this post? Well when we create a new address for a new customer either with the customer registration form, or in Admin by adding a new customer with an address in Manage Customers, we’ll see the new value for ‘website’ saved as a row in the ‘customer_entity_address_varchar’ table along with other new varchar attribute values in adjacent rows for this new customer address entity id. And when we edit the ‘website’ value for this address either in Admin in Manage Customers, or in the customer’s My Account Address edit page, then we’ll change this value in the ‘customer_entity_address_varchar’ table’. This is what we’d expect.
What we don’t yet have is a link between the value entered or edited for ‘website’ in Customer Registration, Manage Customers and My Account on the one hand and the value which appears for ‘website’ in the Admin Sales Orders Create New Order page on the other. When we create a new order here, the website input field is initially blank. (Of course, we can’t yet create a new order with a website attribute in checkout, because we haven’t changed the templates associated with checkout to show the new website attribute.)
In the next post, we’ll add ‘website’ to checkout, and along the way we’ll ensure that a customer’s website value appears as the initial value for the ‘website’ input field when we create a new order.