In this post we’ll add an attribute with a select input field. First, we’ll store the select options in the EAV database, then we’ll see how we can allow the client to update the options in Admin.
The attribute we’ll add allows the customer to add their reason for approaching the business. We’ll call the attribute ‘reason’. We’ll run an upgrade script upgrade-0.2.0-0.3.0.php to add it to the database. We’ll also change the version number of config.xml from 0.2.0 to 0.3.0.
1<?php
2$installer = $this;
3
4$installer->startSetup();
5
6$this->addAttribute(‘customer’, ‘reason’, array(
7‘type’ => ‘int’,
8‘input’ => ‘select’,
9‘label’ => ‘Reason for approaching’,
10‘global’ => 1,
11‘visible’ => 1,
12‘required’ => 0,
13‘user_defined’ => 1,
14‘visible_on_front’ => 1,
15‘source’=>’eav/entity_attribute_source_table’,
16‘option’=> array(
17‘values’ => array(
180 => ‘Internet’,
191 => ‘Tradeshow’,
202 => ‘Other’,
21),
22),
23));
24
25Mage::getSingleton(‘eav/config’)
26->getAttribute(‘customer’, ‘reason’)
27->setData(‘used_in_forms’, array(‘adminhtml_customer’,’customer_account_create’,’customer_account_edit’,’adminhtml_checkout’))
28->save();
29
30$installer->endSetup();
Running the script has changed the version number from 0.2.0 to 0.3.0 in the ‘core_resource’ table.
Note the similarities with install-0.1.0.php of part 2 of this series. But this time, the first argument of addAttribute, entity type, is ‘customer’ rather than ‘customer_address’. The ‘type’ attribute is set to ‘int’ rather than ‘varchar’. And, we now have a source specified, which identifies our source model as ‘eav/attribute_source_table’.
As before in part 2, we’ve added a row to the ‘eav_attribute’ table, now with ‘entity_type_id’ set as 1 for ‘customer’, ‘backend_type’ set as ‘int’ and ‘source_model’ set as ‘eav/attribute_source_table’. As before, the script also adds a row to ‘customer_eav_attribute’. This time though using the source model ‘eav/attribute_source_table’ with the options as shown in rows 16 through 22 gives us entries in the tables ‘eav_attribute_option’ and ‘eav_attribute_option_value’. Three rows are added to ‘eav_attribute_option’ with the attribute_id of the new attribute and option ids of 34, 35 and 36 (in my case). In ‘eav_attribute_option_value’ are the option ids with their associated values ‘Internet’, ‘Tradeshow’ and ‘Other’.
When we make a selection, as we can now we’ve run the script, in Admin-Customers-Manage Customers-Account Information, the value we select, say ‘Tradeshow’, is stored as 35 (from ‘eav_attribute_option’) in the ‘customer_entity_int’ table.
Return to the Account Information form. and the value ‘Tradeshow’ shown in the ‘reason’ field is taken from the ‘eav_attribute_option_value’ table, where the value 35 stored in the ‘customer_entity_int’ table is matched with the option_id in the ‘eav_attribute_option’ table. Its the source model ‘eav/attribute_source_table’ that allows us to use the tables ‘eav_attribute_option’ and ‘eav_attribute_option_value’ in this way.
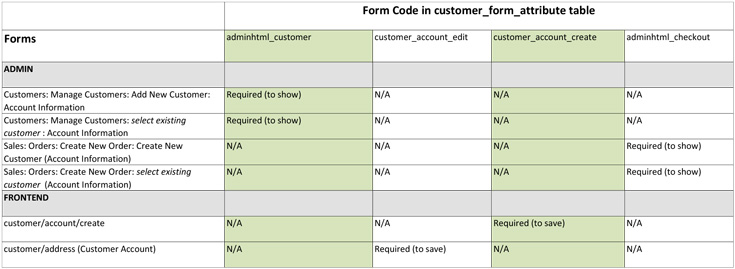
The script also contains the setData(‘used in forms’,..) method which as before in part 2 allows us to set the forms where we want this attribute to be saved. The table shows the forms the client requires in the left column and the form codes along the top row that we need to use these forms. Having run the upgrade script, these form codes are now stored in the customer_form_attribute table.
‘reason’ attribute – mapping of form to form code
As in part 2, we need to amend the front-end templates to display the new attribute. For customer registration (‘customer/account/create’), we need to add the rows shown in red in template/persistent/customer/form/register.phtml.
35<div class=”account-create”>
36<div class=”page-title”>
37<h1><?php echo $this->__(‘Create an Account’) ?></h1>
38</div>
39<?php echo $this->getChildHtml(‘form_fields_before’)?>
40<?php echo $this->getMessagesBlock()->getGroupedHtml() ?>
41<form action=”<?php echo $this->getPostActionUrl() ?>” method=”post” id=”form-validate”>
42<div class=”fieldset”>
43<input type=”hidden” name=”success_url” value=”<?php echo $this->getSuccessUrl() ?>” />
44<input type=”hidden” name=”error_url” value=”<?php echo $this->getErrorUrl() ?>” />
45<h2 class=”legend”><?php echo $this->__(‘Personal Information’) ?></h2>
46<ul class=”form-list”>
47<li class=”fields”>
48<?php echo $this->getLayout()->createBlock(‘customer/widget_name’)->setObject($this->getFormData())->setForceUseCustomerAttributes(true)->toHtml() ?>
49</li>
50<li class=”field”>
51<label for=”email_address” class=”required”><em>*</em><?php echo $this->__(‘Email Address’) ?></label>
52<div class=”input-box”>
53<input type=”text” name=”email” id=”email_address” value=”<?php echo $this->escapeHtml($this->getFormData()->getEmail()) ?>” title=”<?php echo $this->__(‘Email Address’) ?>” class=”input-text validate-email required-entry” />
54</div>
55</li>
56<li class=”field”>
57<div class=”field”>
58<?php $attribute = Mage::getModel(‘eav/config’)->getAttribute(‘customer’,’reason’); ?>
59<label for=”reason” class=”<?php if($attribute->getIsRequired() == true){?>required<?php } ?>”><?php if($attribute->getIsRequired() == true){?><em>*</em><?php } ?><?php echo $this->__(‘Reason for approaching us’) ?></label>
60<div class=”input-box”>
61<select name=”reason” id=”reason” class=”<?php if($attribute->getIsRequired() == true){?>required-entry<?php } ?>”>
62<?php
63$options = $attribute->getSource()->getAllOptions();
64foreach($options as $option){
65?>
66<option value='<?php echo $option[‘value’]?>’ <?php if($this->getFormData()->getReason() == $option[‘value’]){ echo ‘selected=”selected”‘;}?>><?php echo $this->__($option[‘label’])?></option>
67<?php } ?>
68</select>
69</div>
70</div>
71</li>
72<?php if ($this->isNewsletterEnabled()): ?>
73<li class=”control”>
74<div class=”input-box”>
75<input type=”checkbox” name=”is_subscribed” title=”<?php echo $this->__(‘Sign Up for Newsletter’) ?>” value=”1″ id=”is_subscribed”<?php if($this->getFormData()->getIsSubscribed()): ?> checked=”checked”<?php endif; ?> class=”checkbox” />
76</div>
77<label for=”is_subscribed”><?php echo $this->__(‘Sign Up for Newsletter’) ?></label>
78</li>
79<?php endif ?>
To add the attribute to My Account / Edit Account Information we add the the following code shown in red in template/customer/form/edit.phtml.
31<form action=”<?php echo $this->getUrl(‘customer/account/editPost’) ?>” method=”post” id=”form-validate”>
32<div class=”fieldset”>
33<?php echo $this->getBlockHtml(‘formkey’)?>
34<h2 class=”legend”><?php echo $this->__(‘Account Information’) ?></h2>
35<ul class=”form-list”>
36<li class=”fields”>
37<?php echo $this->getLayout()->createBlock(‘customer/widget_name’)->setObject($this->getCustomer())->toHtml() ?>
38</li>
39<li>
40<div class=”field”>
41<label for=”email” class=”required”><em>*</em><?php echo $this->__(‘Email Address’) ?></label>
42<div class=”input-box”>
43<input type=”text” name=”email” id=”email” value=”<?php echo $this->htmlEscape($this->getCustomer()->getEmail()) ?>” title=”<?php echo $this->__(‘Email Address’) ?>” class=”input-text required-entry validate-email” />
44</div>
45</div>
46<div class=”field”>
47<?php $attribute = Mage::getModel(‘eav/config’)->getAttribute(‘customer’,’reason’); ?>
48<label for=”reason” class=”<?php if($attribute->getIsRequired() == true){?>required<?php } ?>”><?php if($attribute->getIsRequired() == true){?><em>*</em><?php } ?><?php echo $this->__(‘Reason for approaching us’) ?></label>
49<div class=”input-box”>
50<select name=”reason” id=”reason” class=”<?php if($attribute->getIsRequired() == true){?>required-entry<?php } ?>”>
51<?php
52$options = $attribute->getSource()->getAllOptions();
53foreach($options as $option){
54?>
55<option value='<?php echo $option[‘value’]?>’ <?php if($this->getCustomer()->getReason() == $option[‘value’]){ echo ‘selected=”selected”‘;}?>><?php echo $this->__($option[‘label’])?></option>
56<?php } ?>
57</select>
58</div>
59</div>
60</li>
61<?php $_dob = $this->getLayout()->createBlock(‘customer/widget_dob’) ?>
Note in both templates, we’ve used Mage::getModel(‘eav/config’)->getAttribute(‘customer’,’reason’) to get the properties of the attribute ‘reason’. With this model, we’ve then used getIsRequired() to get ‘true’ or ‘false’ from the ‘is_required’ column in the eav_attribute table. If ‘true’ we set the class to ‘required’ and javascript will ensure the field must be entered. Note that other input fields in the templates have not taken the same approach, hard coding the class name, rather than obtaining it from the eav_attribute table.
The method getSource in both templates gets the source model identified in the eav_attribute column ‘source_model’. And the method getAllOptions gets the options stored in the source model. We’ll discuss source models in more depth in the next section.
Before we move on from templates let’s ensure things look good. In order to display the new fields correctly in our templates we need to add some CSS to the end of styles.css.
1815.form-list li.control .input-box {clear : both; display: block; }
1816.form-list li.control .input-box label, .form-list li.control .input-box input {float : left; }
1817.form-list li.control .input-box input {float : left; margin-top: 2px;}
Having set up our new select attribute in the forms needed, we’re some way there to meeting the client requirement. We’ve specified select options but we haven’t made it possible for the client to change these themselves. We need to talk more about source models.
Source Models
In addition to ‘eav/entity_attribute_source_table’ which stores its values in the tables ‘eav_attribute_option’ and ‘eav_attribute_option_value’ as we’ve seen, Magento sports a whole bunch of other prebuilt source modes. For example, ‘eav/entity_attribute_source_boolean’ provides a selection of simply ‘yes’ or ‘no’. The source model ‘customer/entity_address_attribute_source_country’ provides a list of countries.
We can also set up our own source models. For this, we’ll need to specify the models tag in config.xml, and we’ll need to build the model. Add the following to the global tag in config.xml.
9<models>
10<exploration>
11<class>Blessthemoon_Exploration_Model</class>
12</exploration>
13</models>
Create the file Reason.php and store it in your module. We’ve added an extra option ‘Word of Mouth’, so the change from previous will be obvious in our forms. The source model must extend ‘Mage_Eav_Model_Entity_Attribute_Source_Abstract’.
1<?php
2class Blessthemoon_Exploration_Model_Entity_Reason extends Mage_Eav_Model_Entity_Attribute_Source_Abstract
3{
4public function getAllOptions()
5{
6if (!$this->_options) {
7$this->_options = array(
8array(
9‘value’ => ”,
10‘label’ => ”,
11),
12array(
13‘value’ => ‘1’,
14‘label’ => ‘Trade Show’,
15),
16array(
17‘value’ => ‘2’,
18‘label’ => ‘Internet Search’,
19),
20array(
21‘value’ => ‘3’,
22‘label’ => ‘Word of mouth’,
23),
24array(
25‘value’ => ‘4’,
26‘label’ => ‘Other’,
27)
28);
29}
30return $this->_options;
31}
32}
Update the source model in the ‘eav_attribute’ table. We can use the simple upgrade script ‘upgrade-0.3.0-0.4.0.php’ to do this rather than tinker with the database directly. Remember to update the version of config.xml to 0.4.0 before you run the script.
1<?php
2$installer = $this;
3
4$installer->startSetup();
5
6$installer->updateAttribute(‘customer’,’reason’,array(‘source_model’=> ‘exploration/entity_reason’));
7
8$installer->endSetup();
Run the script and, with the other changes in place, we should now see the new options in our select field including ‘Word of Mouth’. So we’ve transitioned from storing the options in the database, to storing them here in Reason.php.
We’re still not able to allow the user to update the selection themselves. For that we’ll need to set up a field in Admin-System-Configuration which the user can update, and have Reason.php refer to the options they set up.
Driving the source model from Admin
First we’ll want to add a new tab with a text area field to Magento Admin. We won’t go into the detail here. If you’re interested, a good overview can be found here in an article by Johann Reinke. Here’s the contents of system.xml that we need to add to our module’s etc folder.
1<?xml version=”1.0″?>
2<config>
3<tabs>
4<customconfig translate=”label”>
5<label>Blessthemoon Configuration</label>
6<sort_order>150</sort_order>
7</customconfig>
8</tabs>
9<sections>
10<selectoptions translate=”label” module=”adminhtml”>
11<label>Customer Select Options</label>
12<tab>customconfig</tab>
13<sort_order>10</sort_order>
14<show_in_default>1</show_in_default>
15<show_in_website>1</show_in_website>
16<show_in_store>1</show_in_store>
17<groups>
18<general translate=”label”>
19<label>Set up select options</label>
20<sort_order>50</sort_order>
21<show_in_default>1</show_in_default>
22<show_in_website>1</show_in_website>
23<show_in_store>1</show_in_store>
24<fields>
25<textarea translate=”label comment”>
26<label>Specify customer source</label>
27<comment>Enter customer source codes separated by a comma.</comment>
28<frontend_type>textarea</frontend_type>
29<sort_order>20</sort_order>
30<show_in_default>1</show_in_default>
31<show_in_website>1</show_in_website>
32<show_in_store>1</show_in_store>
33</textarea>
34</fields>
35</general>
36</groups>
37</selectoptions>
38</sections>
39</config>
We’ll also need to add adminhtml.xml to the same folder:
1<?xml version=”1.0″?>
2<config>
3<acl>
4<resources>
5<admin>
6<children>
7<system>
8<children>
9<config>
10<children>
11<selectoptions>
12<title>Customer Select Options</title>
13</selectoptions>
14</children>
15</config>
16</children>
17</system>
18</children>
19</admin>
20</resources>
21</acl>
22</config>
Head to System-Configuration within Admin. You’ll see a new section labeled “BLESSTHEMOON CONFIGURATION” with a tab labeled “Customer Select Options”. Enter data separated by commas into the text area field in this tab’s ‘Set up select options’ group. This is shown in the screen shot with a number of options entered.
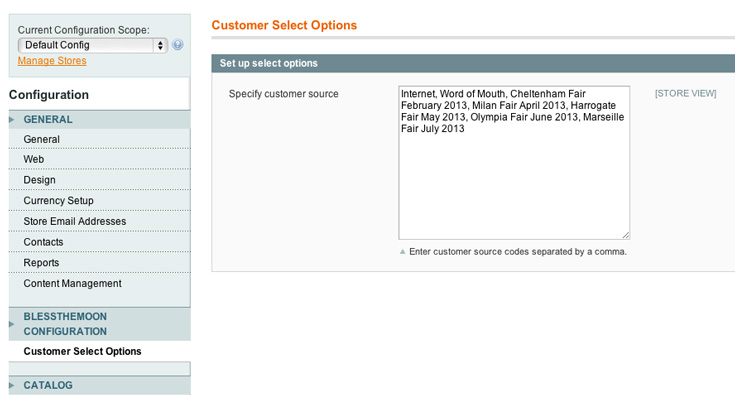
With System.xml in place a new row has been added to the ‘core_config_data’ table with columns for ‘value’ and ‘path’. In ‘value’, you’ll see any options which have been entered into the text area field. Note the contents of the ‘path’ column which contains ‘selectoptions/general/textarea’. We’ll use this string in our code to get the value of our text area field.
To access the contents of this text area field in the forms we’ve set up, we’ll need to amend the contents of our model file ‘Reason.php’. You can see in line 7, how we specify the path from ‘core_config_data’ in the method getStoreConfig(). In the code. we’ve made provision for commas entered in the wrong places in the text area field, such as 2 or more together or at the beginning or the end of the entry.
1<?php
2class Blessthemoon_Exploration_Model_Entity_Reason extends Mage_Eav_Model_Entity_Attribute_Source_Abstract
3{
4public function getAllOptions()
5{
6if (!$this->_options) {
7$sourceString = Mage::getStoreConfig(‘selectoptions/general/textarea’);
8$sourceArray = array_filter(explode(‘,’,trim(strip_tags($sourceString))));
9
10$this->_options = array();
11$this->_options[] = array(
12‘value’ => ”,
13‘label’ => ‘Choose Option..’
14);
15foreach($sourceArray as $sourceIndex => $sourceItem){
16$this->_options[] = array(
17‘value’ => $sourceIndex + 1,
18‘label’ => $sourceItem
19);
20}
21}
22return $this->_options;
23}
24}
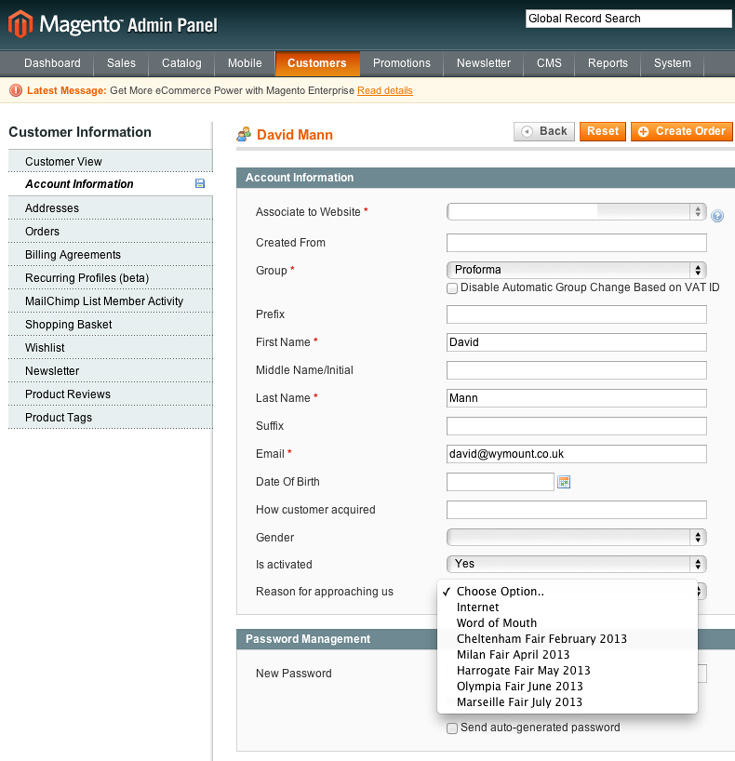
With the model file amended, we should now be able to see the select options anywhere on our site where we input the value for ‘reason’. For example, in Admin-Customers-Manage Customers Account Information, we should see the following:
With the changes we’ve made in this post, the client now has full control over what’s displayed in the ‘reason’ select options. We’ve seen how much can be accomplished by using a custom source model and deploying this in conjunction with fields set up in Magento Admin using system.xml. In subsequent posts, we’ll want to explore other options within the eav_attribute and customer_eav_attribute tables such as ‘validate_rules’.
1 COMMENT
If you think about it, this makes sense. As the end-programmer-user of the system you want a set of methods you can use to talk to and manipulate your Models. You don’t care what the back-end storage looks like, you just want to get properties and invoke methods that trigger business rules.